We learn the basics of the equipment we will be using in class and in the field starting with the video cameras, microphones, and some basic accessories.
Learning objectives of this class: Students learn the basic controls of our camera and microphones as they will be producing each other's "living portraits." These are video clips students will make of each other speaking about their career objectives. The videos will be produced by the students, the data transferred to a computer workstation where they will be edited and optimized for web deployment. In this lesson, students will learn the concept of ENG (for Electronic News Gathering) location shooting and the values of this approach.
The Following Setup Is For a Basic Interview Video Shoot
1.
Load the Media: Tape Loading and Unloading… The format of the tape media we use in class
a.
DVCAM
b.
MiniDV
2.
Know Your Basic Video Camera Controls
a.
Manual Operation including shutter, iris and exposure value (EV) Best used in situations where the camera is being operated in a consistently lighted scene.
b.
Automatic Operation Best in situations where the camera is moving from one lighting condition to another.
3.
Lens operation
a.
Focus
b.
Zoom
4.
Camera, Lens and Tripod Movement
a.
Zoom (through manipulation of camera’s optics the focal length can be lengthened and shortened bringing the subject closer or farther to the camera)
b.
Tilt (the camera is at a fixed height but moves up and down)
c.
Pan (camera is at a fixed point and moves from side to side)
d.
Dolly (entire camera moves side to side)
5.
Basic Audio Controls
a.
Manual Operation (advantages: compensates for extreme light or contrast situations). On most cameras you have thumbwheels that control iris and shutter speed.
b.
Automatic Operation (advantages: good in situations where the camera is moving from one lighting condition to another).
c.
Automatic Focus (not available on high-end professional cameras, so you must learn how to focus the camera and keep your subject in proper focus).
d.
Microphone Connections
e.
Stereo or Multi-track vs. Monaural or Single Track
f.
Wear Headphones: Monitoring Sound and the critical importance of a headset or headphones.
6.
Using Accessory Microphones, hand microphones, boom microphones, and body packs... The importance of capturing quality sound
a.
Microphone placement should be as close to the subject as possible.
b.
Controlling ambient sound might be impossible, but you should assess the ambient noise level by using quality headphones, and selecting a microphone that will mitigate the problem.
c.
Omni vs. Directional Microphones Sensitivity is the key factor here. Every ENG kit ideally should contain
i.
an omni-directional microphone with 180 degree cone,
ii.
a directional microphone with a 90 degree cone and engineered to be less sensitive to handling noise
iii.
and a shotgun or short shotgun that has a 45 degree cone but is sensitive at great distances. It does the best job of screening out ambient noise.
7.
The camera microphone: All cameras have a microphone that records “matte” sound. This is ambient sound captured at the scene. In multiple camera shots or where sound my be captured with an off-camera recording device, the matte sound track enables you to synchronize the video with the sound track later in post production.
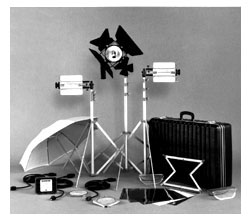
8.
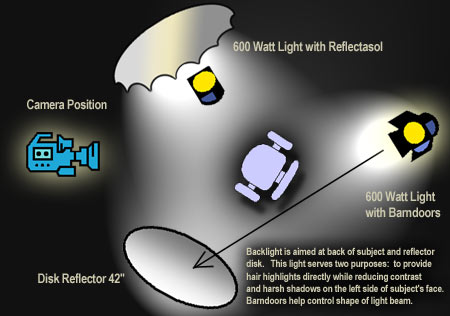
Basic Location Setup using two lights and a reflector (see diagram)
a.
Main Light (primary illumination source)
b.
Fill Light (half power light or reflected light to slightly illuminate shadow areas but not eliminate them)
c.
High Light (used to cut the subject away from the background)
9.
Camera and subject position: The Camera should be located at least 10 to 12 feet away and then frame up your subject using the zoom controls.
10.
Composition in the frame: Position your subject slightly to the right of the frame never in the center.
11.
Head Placement in the frame
a.
The subject’s head must be slightly below the top of the frame, and never in the middle of the frame. A common mistake among first-time shooters is to place the head in the middle of the frame. DO NOT PUT THE HEAD IN THE MIDDLE OF THE FRAME… EVER! Such poor composition reveals too much wasted space above the subject’s head making the person appear too short.
b.
Remember: Draw a horizontal line dividing the frame equally from top to bottom. Make sure the eyes, nose and chin are above that line in the upper half of the frame.
12.
Background: Your background should be at least as far in back of the subject as the camera is from the subject. The Camera should be located at least 10 to 15 feet away and then frame up your subject using the zoom controls. The background therefore should be at least 10 to 15 feet behind the subject. Never put your subject up against a wall or curtained background (unless there are logos all over it as in a post-game or post award ceremonial press conference). There should always be space, and the more space the better.
Learning Objectives Set #2
We capture (transfer) our video to the editing computer
Learning objectives of this class: Students learn how to capture video footage from the camera to the computer’s hard drive. It is in this environment, using Adobe Premiere, where we will edit our living portraits. Students learn how to connect the camera using the 1392 FireWire cable, and control the camera operation from the Adobe Premiere desktop. As the files transfer, we will be saving and naming clips and placing them automatically in Adobe’s project bin. Students learn how to set the programs preference files, configure scratch disks for temporary file storage, and save their projects or works in process.
1.
Connect the camera to the computer via the 1393 cable (provided at the workstation). In this classroom configuration, we are using our cameras as tape decks. The 1394 cable allows you to download video from the camera to the computer, and once it’s edited, it can be output through the same wire back to the tape that’s inside the camera.
2.
Make sure the computer and Adobe software can control the camera deck. There are drivers that must be present that allows the computer, software, camera or deck to communicate with one another.
3.
You must set your scratch disk files Every time you launch the program. In the ideal configuration is as follows:
a.
Your Adobe software is installed and operating on your C-Drive.
b.
Your 1394 cable (FireWire) is attached to your computer’s 1394 port and attached to your camera’s 1394 port.
c.
Your scratch disk is your secondary media storage drive (at Clarke, it’s the M-Drive and a directory with your name or the name of your project on it.
d.
You must check this every time you launch your software and your project because it may revert to another media drive directory, and this you want to avoid at all costs.
How Adobe Premiere Works
Adobe Premiere works with your computer’s operating system to allow you to capture and edit video on your computer.
Digital video is a complex process that involves powerful mathematical equations to reproduce video on a computer screen.
Algorithms
An algorithm is a mathematical equation, its purpose is to convert analog images into a stream of binary code. This code, using your computer's hardware and software capabilities to produce images on your screen, paints frames of pixels much like an animation flip book, and times the sequence using your computer's system clock.
As you can imagine, the longer the video, the larger the screen image, the more data is required to produce the stream of data, and the more memory, more processing speed and more storage capacity you need to manage the data. Add to this stereo audio, and you quickly require multi-gigabyte capacity drives to handle it all. And those drives need to be high speed because they will spin and spin to keep the stream of data moving though your processor.
Digital video on your computer is a miracle of engineering. It evolved as computers became more powerful and less costly, which made it practical to develop software and hardware add-ons to enable video and film producers to actually digitize video (converting it from analog signals to digital data) that can be stored on a hard disk. Today, digital video is captured directly with DV cameras and the signal can go directly into your computer through a FireWire (1394) cable.
What is a CODEC?
For computers to efficiently handle the enormous amount of data that is generated by this process, engineers applied compression algorithms to the data files that could compress the data for storage, and decompress the data when commanded to do so. Compression can utilize a number of strategies, the most common of which analyze the color data of the video image and reduce the number of colors required to paint the images pixels. These compression and decompression algorithms are called CODECs. The most common CODECs are Motion Jpeg, MPEG2 (CD-ROMs) and MPEG3 (DVD-ROMs). They were developed by the industry as standards that enable vendors to make compatible accessories and software products that allow the industry to grow.
Now that we have streaming images and data in our computer, we need an editing program to manipulate these files.
Digital video editing software is referred to as nonlinear video editing. This refers to the timeline interface that is used to put segments of video (called clips) together to make a larger if not longer visual statement.
To understand this process you need to go back (not too far) in history to know how film was edited.
Film was shot, processed and hung in strips or on smaller reels to be combined in a Movieola machine that is a simple viewer that allows the editor to view the clips and physically splice them together a film cutter and adhesive, a long and tedious process. The many segments of film were often stored in bins. The film editor would splice a film together, add the sound track, create a new master negative from the original footage, and then duplicate the master for theatrical release.
Your source video clips remain unaltered
Adobe Premiere allows you to combine and edit your video clips into a coherent program, but the original source video in your computer remains unaltered. Adobe’s production timeline allows you to combine edited or “trimmed” portions of clips, combine sound files, and you can filter and alter the color and contrast of any clip on the timeline. However, the original source video that is represented on the timeline still remains completely unaltered.
This is because Adobe’s production timeline codec renders changes and edits to the clips on the timeline to scratch folders you’ve designated for your project when you launched the application. These files generated by Adobe Premiere must remain on your computer for the life of your project. If they are moved or deleted, your project will have to render transitions and filtrations and other modifications that were used on the timeline all over again which can be a time consuming process. Worse, losing synapses between your project and these scratch files could permanently cripple your project.
This is why it’s so important for you to carefully set up each editing session upon launch, making sure your scratch files are saved in the appropriate designated scratch file with your project’s name on it. Otherwise, you may lose all of your work.
Learning Objectives Set #3
We begin the process of editing our projects in Premiere
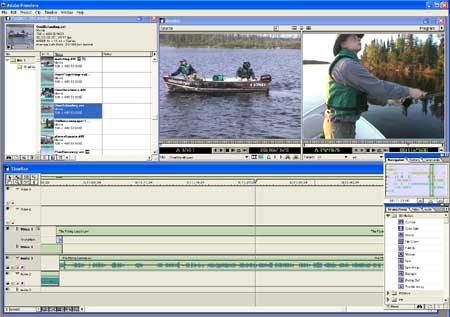
Learning objectives of this class: We learn the basic production desktop of Adobe Premiere. This includes the Project Bin, the Source Monitor, the Project Monitor, the Project Timeline, the Effects Menu and the Effects Control Panel. We will begin at the launch designating our project scratch disks and directories on the M Drive. Then we will demonstrate how each of the menus and windows operate on the desktop.
Critical Review Step
Review the steps of project set up in Premiere. Emphasize to students that failure to ensure scratch disk and file synapse with the proper drive and directory will lead to project failure and lost files.
Steps to Project Setup in Adobe Premiere:
-
Launch Adobe Premiere Program
-
Open Preferences Menu
- Choose Scratch Disk Command
-
Using the Browse field, choose the M-drive (Clarke’s Communication Lab Network)
-
If a file isn’t already created, create one with your name or the name of your project.
- Remember that every time you wish to work on your project, you must repeat these first five steps. EVERY TIME. The reason for this is that the computers purge preference data from temp files on the C-drive at least once every 24 hours or when the machines are shut down or rebooted. Hence, your preferences are blown away. If you don’t designate scratch drives and reconnect your project files, to your project, you will lose track of the files or worse, lose them altogether.
The Adobe Premiere Desktop in A-B Roll Format
For this course we are going to use the A-B Roll Format for setting our desktop.
The Story behind A-B Roll Terminology
A-B roll is the traditional editing format whose legacy is based in the age of multi-playback machine editing. This interface design was carried through to modern, non-linear editing software so the terminology and the editing environment would be somewhat familiar and comfortable to traditional film and video editors.
The A- and B-roll refers to the entire process from start to finish. The camera crew would shoot its main footage on a film reel or cassette called the “A-roll” and secondary footage on a separate reel or “B-roll” to help illustrate the story or depict what someone on the A-roll sound track is talking about. So that the viewer wouldn’t have to see a talking head for too long a period of time, the B-roll served to provide imagery the editor could cut away to while preserving the sound track from the A-roll. This is called an “insert edit.”
In the editing suite, the A roll would be loaded on one machine, and the B-roll loaded on a second machine. A third recording device would be used to create an edit master of the program being created.
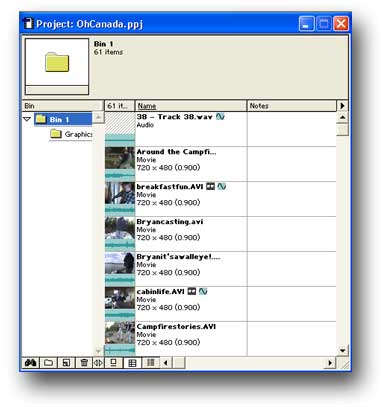
1.
Project Bin: The project bin contains all of the assets that you will use to create your program. This includes
a.
Video Clips in AVI format
b.
Graphics and Text Graphics in JPG or onboard text editor format
c.
Music in WAV or MP3 format
d.
Animations in AVI format
2.
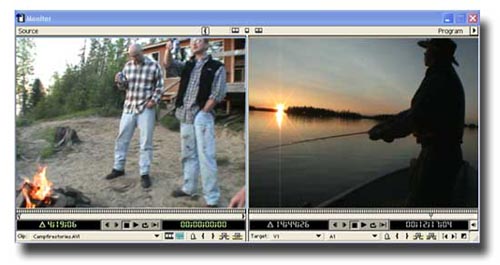
Source Monitor: The monitor in which you view and edit your clips, otherwise known as trimming before you place the clip on the timeline. In Adobe Premiere, you can select just the video track or audio track to bring down to the project timeline.
3.
Project or Program Monitor: It’s right next to the Source Monitor. It shows your project as it takes shape on the timeline.
4.
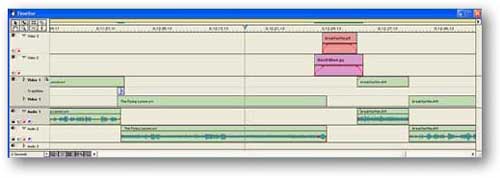
Project Timeline: This is the heart of Premiere. It’s where you assemble your project. You trim your clips in the source window, and using your mouse, drag and drop them on any of the video or audio tracks of the Project Timeline. There are also additional video and audio tracks, and you can add or subtract them using a add track or remove track command. There is also a Special Effects track between the Audio A and B tracks. This enables you to drag and drop transitions (such as dissolves, fades, tumbles, wipes, etc.) between two overlapping tracks on the timeline. Also on the timeline, you have the ability to control volume on the audio track and opacity on the video tracks using rubber band tools that contain vectors that can move the rubber band up or down on the track.
5.
Effects Menu: This menu contains the effects and filters for your video and audio clips on the timeline. When you add an effect or filter, your Effects Control Panel contains specific controls that change the characteristics of the effect or filter you applied.
6.
Effects Control Panel: This menu appears when you add a special effect filter, transition and what have you. It allows you to have variable controls over effects and filters you apply.
Learning Objectives Set #4
We edit our projects in Adobe Premiere
Learning objectives of these classes: Students will have the opportunity to edit their own video portrait of themselves. They must contain the following effects available in Premiere: A fade in at the beginning, a dissolve between clips, A-Roll cutaway to B-Roll clip but using the A-Roll Sound track, a special effects transition of your choice, and a fade out. Total time of the segment should not exceed one minute.
Steps to completing this Lesson:
The Capturing Process
1.
Launch Adobe Premiere and choose NTCS Video in the Project Settings Window and 48 kHz Audio. Then, immediately open your Preferences Menu.
2.
In the Preferences Menu, choose Scratch Disk. Click the Browse button and choose your directory on the M-Drive. If there isn’t an appropriate personal directory, create one.
3.
To capture the footage from the camera through the 1394 (FireWire) port, click on Movie Capture in the File Menu. Make sure you have device control. The camera should be turned on and appropriately connected.
4.
Device controls at the bottom of the screen should reflect the device control on the deck or camera. You have Play, Stop, Pause, Fast Forward, Frame Forward, Fast Reverse and Frame Reverse. But your most critical button you need to know now is the Record Button. The color of it is red.
5.
You will click the Play button to play the tape on the camera. You will click the record button to capture the footage on the camera and transfer it to your hard drive directory.
6.
When you’ve clicked the stop button to cease recording, a menu pops up to enable you to save your clip to your Project Bin. Give your clip a name and begin the file name with the following numerical code: 001(name of clip). Your next clips will be numbered 002, 003, 004, etc. This will keep your clips in sequence so you can easily find a clip later. Failure to do this causes the program to order the clips any way it chooses by the names you’ve given the clips files. That’s typically alphabetical.
7.
Continue with this portion of the project until your clips are saved in your bin.
The Editing Process
1.
You have successfully captured your source clips, now give your project a name by choosing Save As from the File Menu. Save your project to your M-Drive Directory.
2.
The Premiere Workflow is as follows: From the production bin, drag and drop your source clip into the Source Monitor window. There you will see the entire clip with its own timeline. Use the IN and OUT marks to set a beginning and end point on the source clip’s timeline. Once you’ve made this decision, go on to the next step.
3.
Drag your trimmed clip to the Project Timeline. Drag and drop the video onto Track #1. Notice how the audio portion of the clip automatically appears on the Audio Track #1 below. These files are linked so voice and sound will synchronize with the action.
4.
Edit and drop your next video clip to the Project Timeline and it will snap to a point right behind the previously placed clip on Video Track #1.
5.
Click on the ENTER key on your keyboard which will do two things: render the video edit and begin playing your project from the timeline. Since a straight edit, which you just performed with two adjoining clips on the Project Timeline, no processor rendering is required, and the project will play immediately.
6.
Now, move your second clip from Video Track #2 to Video Track #1B. Overlap the tracks slightly be perhaps one to two seconds on the timeline.
7.
Note the Transition Track that is between Video Tracks #1A and #1B. This track is designated for a transition of your choice. A transition is a special effect… anything from a simple dissolve to a 3-D edit like a “tumble away,” “curtain,” “click wipe.” Go to the Transition Menu and choose a video transition from the menu (be creative and choose any transition you wish). Drag and drop the transition on the Transition Track between Video Tracks #1A and #1B in space where the two tracks overlap on the project timeline.
8.
Make sure the transition you choose and drag to the Transition Track between 1A and 1B covers the amount of time within the two track’s overlap space on the timeline. Click on the Enter key on your keyboard. This will start the brief rendering process that creates the transition and saves this file to your scratch directory on the hard drive that is storing your project.
9.
Once the rendering is complete, the program will begin to play automatically within the project’s work area and you can see how your edit looks in the Project Monitor.
Learning Objectives Set #5
We complete project’s edit phase and prepare our projects for saving to tape, CD-ROM or deployment on the Web…
Learning objectives of this class: Students must complete their segments and seek approval from the instructor before proceeding to the next step which includes saving and optimizing their video clips for deployment on the Web. The students will learn the following features of Adobe Premiere: The Work Area that can isolate portions or include the entire project for exportation from the timeline; the “Export” feature that enables the editor to save projects in various output formats including AVI, MPEG, WAV (audio), and at least two browser compatible player formats such as Real Player and Windows Media Player.
Steps to Saving Our Projects to Tape…
1.
Our projects are now complete on the timeline, all rendered transitions and filters have been made. We are now going to export our movie to tape. You must make sure that your 1394 device (camera or tape deck with fresh tape) is available, plugged into the computer using the 1394 (FireWire) cable, and it recognized by the operating system and the program. It’s best to attach the device before booting the system, but it isn’t absolutely necessary. If your computer is already on and Premiere is launched, the computer should automatically detect and load the appropriate device drivers the moment it detects the camera has been connected to the system. If it’s doesn’t work this way, your may have to reboot the system in any event.
2.
From the File Menu, choose Export/Export to Tape. You will now see a new popup menu that controls your output device. You have at least two options from which to choose. You can output your project directly to tape and it will automatically control your record functions on your device, and it will begin playing the project from the timeline as it is being recorded to tape device. The second method, useful if you are stringing several programs to a single tape, is to choose an IN point on the tape in the tape device from which the show will begin recording. This is possible due to the SMPTE Time Code that is integral to the tape and the code is read by Premiere. Look for the SMPTE Time Code on your desktop device controls panel.
3.
Once recording is complete, the device will be shut down (tape transport and recording functions) by Premiere automatically, and you can rewind your tape and safely remove it from the recording device.
Steps to Saving Our Projects to CD-ROM
1.
This involves recording your project to a compatible file on your hard drive before you record it to CD-ROM. From the File Menu, choose Export to Windows Media File. Your decision on compression formats will depend on how large your file is. The larger the file, the more you have to compress it. Also, you must make a choice as to which media player format you are going to choose. For your information, there are two types of player file compression schemes offered in Premiere: RealPlayer and Windows Media Player. These compression algorithms are respectively supported by Real and Windows who offer the compression schemes as plug-in programs to Adobe, making them easily accessible from within the program. For this lesson we will choose the most popular recording format based on the number of readily installed players in the US market: Windows Media Player.
2.
Once the Windows Media compression menu appears, you have some choices to make. Since this is going to be a file for a CD-ROM, and we know the file is relatively small and will fit on a normal CD-Rom disk, choose compression scheme that will deliver the least amount of compression and the highest quality results.
3.
Depending on what you have available to you in the Windows Media Player application, choose the highest quality based on the maximum amount of data, fastest frame rate, and largest screen size listed. For example, among the best quality schemes available for CD-ROM will include a screen size of 640 pixels wide, 30 frames per second. By comparison, the highest quality for a file capable of playing smoothly on the Web through a cable modem would be a file containing the following specifications: 512 Kbps (kilobits per second throughput speed), 320 x 240 pixels screen size, and a respectable 30 frames per second frame rate.
4.
Make your choice and in the Save As file name field, create a name for your compressed movie. Click Okay and Save.
5.
Once the compression session takes place (it can go rather quickly depending on the power of the computer’s processor you are employing, you are then ready to transfer the file to a CD-ROM. Use Roxio, Nero, or any capable software for that purpose.
Steps to Saving Our Projects to the Web
1.
This involves recording your project to a compatible file on your hard drive before you post it to the Internet. From the File Menu, choose Export Movie. Your decision on compression formats will depend on how large your file is. The larger the file, the more you have to compress it. Also, you must make a choice as to which media player format you are going to choose. There are two offered in Premiere: RealPlayer and Windows Media Player. These compression algorithms are respectively supported by Real and Windows who offer the compression schemes as plug-in programs to Adobe, making them easily accessible from within the program. For this lesson we will choose the most popular recording format based on the number of readily installed players in the US market: Windows Media Player.
2.
Once the Windows Media compression menu appears, you have some choices to make. Since this is going to be a file for the Web, you have several options.
a.
File optimized for multi-bit-rate downloading (the file senses the capacity of the connection and ratchets up or down the bit rate.
b.
Separate files for low speed (phone modem), medium speed (Digital Subscriber Line or DSL), and high-capacity (T-1 or cable modem).
3.
Make your choice and in the Save As file name field, create a name for your compressed movie. Click Okay and Save.
4.
Once the compression session takes place (it can go rather quickly depending on the power of the computer’s processor you are employing, you are then ready to transfer the file to a Website via FTP or comparable interface connection. Then create a link from your webpage to the file name. The browser player will automatically launch the helper application to play the movie on the client’s desktop.
Learning Objectives Set #6
Creating Graphics and Preparing Sound Tracks for Video
Learning objectives of this class: Students must choose a personal theme or topic they wish to illustrate in a 1 minute video clip that will be comprised entirely of words (not spoken but displayed on the screen), a series of still images, and a musical sound track. This lesson will make use of the Project Bin, The Source Monitor and the Project Timeline in Premiere.
In preparation for this exercise, students must choose music for a sound track (any CD will do).
Students must have a beginner level working knowledge of Adobe PhotoShop.
Students must bring to class in a digital format a selection of personal photographs, illustrations or whatever they deem appropriate.
A suggestion: Create a 1 minute video birthday or anniversary card for someone, a couple you know, etc.
Preparing Graphics
1.
Open Adobe Photoshop and create a new file that has the following specifications: 720x480 pixels and 72 dpi.
2.
Choose a background color that will serve your color scheme and that which will provide sufficient contrast to images or text that will be superimposed upon it.
3.
From the Filter Menu, choose Texture and Texturizer. In this menu, choose an appropriate textural map (burlap would be good)
4.
From the Filter Menu, choose Render and then Lighting Effects.
5.
Choose a soft flood lighting scheme, single source, and adjust specifics accordingly.
6.
Save a plain copy of your background image to JPG format to a file in your personal directory (we will import this plain background into Premiere later). Meanwhile, also save your background file as a “master layer image file” so we can use it for other purposes during this lesson.
7.
Now open one of your photograph files you intend to include in the program. It doesn’t matter if the photo is horizontal or vertical format. We are going to combine it with our background image. Horizontal images in most cases can take up the entire frame. A vertical image can be placed on either side or at an angle on the background. Or we can crop the photo to match the aspect ratio of the frame.
8.
It’s important to understand that unless your finished image conforms to the dimensions of a single frame of DV Video (our standard frame size is 720 x 480 pixels), Premiere will conform and thereby distort the image to conform to the standard. If you try to important a vertically formatted image, it will stretch the image to conform to the 720 pixels wide frame.
Importing your graphics into Premiere
1.
Open Adobe Premiere and import your files by choosing Import Files from the File Menu.
2.
Make sure you import your “Plain Background” image file and immediately put it on the timeline on Video Track #2. Stretch the file on the timeline to cover at least 10 seconds.
3.
Using the opacity control rubber band on the track, create a fade-in and fade out..
4.
Imported images in Premiere behave just like any other video clips. They can be blended together on the Project Timeline with transitions thereby creating interesting animated effects. Combine two image files on Video Track #1A and #1B connected by a transition of your choice from the Transitions Menu.
Creating and Synchronizing a Sound Track
1.
If you have a CD, you must convert your audio track into a MP3 or WAVE file to be able to import it in Premiere. You have at least two software options to accomplish the conversion of the CD-Rom’s native file into and MP3 or WAVE. Some of the machines in the Com Lab have fully functional versions of Real Player. Real Player has conversion software enabling you to convert audio tracks. The other application is Sound Forge. We will discuss the features and functionality of both of these programs.
2.
Once you’ve successfully converted your audio file, we import it into our Project Bin. From there our objective is to trim in it the Source Monitor window, and bring it down to our Project Timeline. Our objective here is to create a 60 second musical or thematic sound track that ends with the true ending of the musical selection and not just a fade out. This is called “back timing the music track from the end.” This means we will be cutting something out of the middle to make sure the total track is 60 seconds in total length.
3.
In the course of editing our music on the Project Timeline’s Audio Track, we will be modulating the volume using the volume controls rubber band on the track. So make sure you expand the track to reveal the audio rubber band control.
4.
The rubber band is a line (red) on which you can add control points or vectors that can be raised or lowered on the audio track making soft or making louder the audio.
5.
You must do an audio fade to half volume, a pickup of volume somewhere in the middle, another fade, another pickup and allow full volume on the conclusion of the track for emphasis.
Learning Objectives Set #7
Writing and Producing a 30 second Commercial with Johnny Rhodes of Radio Dubuque
Objectives of this week's lesson will be to write and produce a 30 second spot that contains the following production elements. It will naturally contain your voice and your words, and they will be recorded on devices provide you in class. You will not have a choice of what you are going to produce because, as in the real world, it will be assigned to you, and you will have to do a sufficient but not thorough job of research to come up with and execute your concept.
1. Your spot can feature more than one voice, but one of the voices has to be yours.
2. You must write a script with appropriate production notes for music, sound effects, and voice talent.
3. You must produce the spot, combining all production elements in Adobe Premiere.
Our guest teacher, John Rhodes, is a radio production professional with many years in the business for local radio stations. A big part of his profession is spot production. He knows how to write them and produce them with award winning flare.
Learning Objectives Set #8
Midterm Exam Scheduled Approximately for this Week
Review:
By now we have successfully photographed and transferred our video clips to workstations for editing and optimization. During this process we have learned the basic production workflow that includes
Gathering: Shooting the video and recording the audio for our production.
Capturing: Transferring the gathered video and audio to a production workstation for editing.
Editing: Just what the term implies. However, it's not what we leave in our final version but what we skillfully remove that requires discipline. The objective of a good edit is to enhance the transfer of information in a given time space.
Compressing and Optimizing: Once editing was complete, we optimized and compressed our project into a file format enabling it to be transferred over limited bandwidth or to play from a CD-ROM. This is true in every case, from DVD to CD-ROM development. All videos and audio files are compressed to fit on a disk or flow through an often narrow digital pipeline. There are excellent software tools available in our production suites to enable this compression and optimization step in the production process. We have learned Windows Media and RealMedia compression schemes for Web deployment.
Deployment It simply means to transfer our finished product to it destination either disk or web server.
Learning objectives for this class have been two fold.
1.
On one hand you are learning the technical aspects of production that include lessons in technology, equipment, and the software we use for production.
2.
On the other hand, we are learning how to organize our creative process from beginning to end.
Learning Objectives Set #9
The Audio Essay Project
Learning objectives of this class: Students will learn the compelling nature of audio in our multimedia world. By producing an audio essay from scratch, students will learn three things:
1.
The techniques and technology of live recording
2.
Working with a subject
3.
How to tell a compelling story with only sound.
Philosophy of the Project
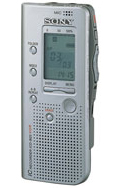
The Audio Essay Project is an important part of your course requirement. It's quite a bit easier to do than the video, however, many of the same techniques of storytelling apply. You use the same software as video editing (Adobe Premiere), and you use the same production techniques which include gathering, capturing and nonlinear editing. What is exciting about this lesson and assignment is that it is we are using a new technology called IC recording which uses a completely solid state recording technology. The recording device is state-of-the-art Sony-engineered micro recorders that deliver spectacular sound reproduction quality for a device this small. This is the ICD-B25 from Sony. This device costs about $50 at Staples, and it delivers enormous value for the price.
 However, be advised that if you lose or damage this device, you will be required to replace it at full value within 24 hours. You will also experience a loss of a whole letter grade on your final assignment if this device is lost or damaged in any way. Logically, if anything happens to these devices, it will throw the entire class behind (not just your situation). Treat this device like it was a newborn baby... your newborn baby.
Here are three simple rules:DON'T PUT IT IN YOUR BOOK BAG OR YOUR POCKET WITH ANY METAL DEVICES.DON'T PUT IT IN A SHIRT POCKET WHERE IT CAN FLY OUT WHEN STOOPING OR BENDING. FIND A POCKET IN YOUR BOOK BAG THAT WILL OFFER COMPLETE PROTECTION AND WHERE IT WON'T COME IN CONTACT WITH ANY ABRASIVE LIKE A METAL OR PLASTIC OJBECT. EVEN PAPER IS ABRASIVE!
What is Expected of You:
You must decide on a topic, reserve the device for recording, and pass it on to the next person in your group.
1.
We divide the class into two teams. Each team will elect a captain who will keep track of where the recorder is on a day-to-day basis. Your objective is for your team to complete its gathering phase of the project within one week.
2.
In one week we will capture the contents of the recorders through our computers in the lab, and you will be responsible to visit the lab as some opportune time before the deadline, and edit your project.
3.
Your project must contain four things: Theme music that can be used at the beginning, as a transition sound between scenes within the program, and at the conclusion of the program. An introduction, recorded by you that sets up the scene, and a conclusion that sums up for the audience your program's point.At least one interview that may or may not contain your voice as inquirer (i.e. just the responses from the interviewee need be in the final production). Ambient sounds appropriate to the content of the program... sounds that capture the atmosphere you are trying to convey.
An Imperative Objective of this Learning Module:
To capture the highest quality sound possible, and this is done by getting the microphone as close to the subject as possible.
Research and Bibliography
You are trying to paint a picture with words, music and sound. This is almost the opposite approach of working with video or film where you are trying to tell your story visually, lessening your audience's dependence narration.
 Some of the best examples of this storytelling strategy are found on National Public Radio's This American Life from WBEZ in Chicago and Radio Diaries featured on NPR's All Things Considered radio show. This American Life uses more of a first person approach to telling one's story. That is, the storyteller is the writer and the speaker or performer. Sometimes there are additional ambient sounds, music for exposition, and other voices where appropriate.
 On the other hand Radio Diaries are recordings of ordinary (or extraordinary depending on your point of view) people in their natural environment telling their stories in their own voice, language, idioms, complete with the ambient sounds of their world.
Let's visit these sites and listen to some of the content of these distinctive storytelling methods and discuss them in class. What will your approach be for your personal project?
Learning Objectives Set #10
Steps to capturing, editing and optimizing our Audio Essays
We produce and Deploy our Audio Essays
Learning objectives of this class: Student will learn the four basic steps to creating their audio essay from source clips to final project. We will be using the exact same software, Adobe Premiere, to edit our shows. Premiere is the ideal multi-track editor for audio as well as video content.
The steps we will take after we have gathered our content:
1.
Connect recording device to the computer's sound card via cable... we will be capturing our audio to a file in a directory on our hard drive.
2.
We use a "Jukebox" program to capture the audio from the device to the computer. We are making an analog to digital conversion through the microphone or line-in jack on the sound card. We will use RealMedia's Jukebox or SoundForge...(whatever is available). Our objective is to save our audio segments as WAV files so they can be easily edited in our target program, Adobe Premiere.
3.
We will import out WAV files in Adobe Premiere where we will edit them and combine them with other sounds, music, and disparate audio segments.
4.
We export the project from Premiere in a file compatible with two applications:
The Web: We will make a RealMedia file to play on our website. This is a compressed file to enable the file to deploy on the Internet.
CD-ROM: This is a less compressed file with an emphasis on quality. This audio will be burned to a CD-ROM
Learning Objectives Set #11
Lecture and Discussion Topic: Talent Releases, Rights and Permissions
Learning objectives of this class: Students learn why these documents (signed by the talent and or subject of your photography or audio gathering) are critical to protecting one’s production and one’s personal liability. Students will also learn the intrinsic difference between productions that require a talent release (for entertainment, promotional or commercial purposes), and those that do not (news shows and segments). Students will be asked to draft their own talent releases based on their lecture notes and research assigned to them by the instructor.
How to draft or obtain a talent release:
Talent Releases in Entertainment vs. News and Information Projects
Ethics and Intellectual Property Rights in Media Production
Music, Rights and Royalties
Fair Use: Is it appropriate for a producer to use a popular song in a sound track without paying for it? Fair use explained.
Licensed and Subscription Production Music
Looping Tracks and Re-Mixes... What constitutes original material?
Assignment: Student must draft their own Non-Compensatory Single Talent Release and have it ready for evaluation at the start of the next Basic Audio and Video class period.
Each student’s Talent Release Must Contain:
- Fields for the Talent’s Name, Date, and the Title of Project
- A paragraph explaining the rights the talent is assigning to the project and producer of the project (image, voice, and or performance?).
- A paragraph precisely describing the frequency and duration of the rights agreement (one time use, possible use in other products or media forms, for content of this project and possibly promotion of same project?).
Learning Objectives Set #11
Lecture and Discussion Topic: Talent Releases, Rights and Permissions (continued)
Learning objectives of this class: We will evaluate and discuss in class each student’s talent release draft. Through critical review, we will endeavor to determine if the drafts meet the minimum requirements of a legally binding document as outlined by the instructor in the previous class.
Learning Objectives Set #12
Lecture and Discussion Topic: Preparing Student ePortfolios
Learning objectives of this class: Students learn how to download their movies from the Web and combine them with other classroom projects onto a single CD optimized for both CD-ROM and the Web. Students will also determine what the best user interface will be for their ePortfolios, and begin the process of designing them either in HTML or Microsoft PowerPoint.
There are two avenues you can choose to create your ePortfolio.
One is HTML which will require the client machine to have a web browser with which to view your portfolio. There are some advantages to this strategy because it makes for a light and highly compatible file that no only will fit on a CD-ROM but be ready for deployment on the Internet.
The second method is to use Microsoft PowerPoint and create a stand-alone player file of the finished work. This is a good strategy if you lack skills or knowledge of producing documents in HTML.
Creating your ePortfolio in Microsoft Word:
·
Create your portfolio in Microsoft Word and convert it to HTML, a good strategy if you are not fluent in web authoring tools.
·
Create separate documents with integrated graphics for each section of your portfolio.
·
Create a splash page on which you will affix hypertext or graphic links to the other documents. Export the documents as HTML (you can still edit them in Word or Microsoft FrontPage).
·
Your target audience will have Microsoft Internet Explorer or similar popular web browsing tool, and your files will open automatically on the client’s machine with links intact.
Create your ePortfolio in Microsoft PowerPoint:
·
Build your portfolio as a typical slide show, but use topical headers to divide the work into logical chapters.
·
Build a splash page on which you place linked buttons or a navigation bar that connects this “home page” to the other sections.
·
Make sure you repeat the buttons in a navigation bar including (i.e.) HOME, PHOTOS, ILLUSTRATIONS, DESIGN, WRITING, CONTACT PAGE, ETC., so the user can navigate freely throughout the content of your presentation without constantly returning to the home page. This is called a radial interactive design. Nothing in your presentation is more than one click from anything else.
·
Graphics can be imbedded in Microsoft PowerPoint, but it’s important that you keep graphics manageable and true to size in the destination document. Do not import high resolution graphics and attempt to reduce them to fit on the screen. It can be done, but it will slow the performance of the program considerably, and the file size will be excessively large and unwieldy.
Create your ePortfolio in Macromedia Dreamweaver:
·
Macromedia Dreamweaver gives you the most design options and the resulting file will work well on a CD-ROM or as a website.
·
You must create an index page (splash page) on which your subtopics are listed and hypertext links or buttons (preferably) that are linked to those subtopics.
·
Create a navigation bar that will link all pages to on another and allow the viewer to return to the home page at will.
·
Source files, graphics, photos, audio and video files cannot be imbedded in a Dreamweaver website or page. This simply means that all source files must accompany your HTML documents on the CD-ROM or on the web site directory on which it will reside.

 elcome to my world... Gary Olsen's Basic Video & Audio Production Course at Clarke College. This is a combination field videography class and nonlinear multimedia (that includes video and audio) editing class. In simple terms, at the completion of the course, you will know how to gather and capture video and audio in the field, download the digital images and sounds to your computer where you will be able to edit these assets into a cohesive, storytelling format. Plus, you'll learn how to optimize and compress your video project to play on the Internet
 The site is festooned with buttons and labels which clearly mark multimedia content. There are instructions on every page that contains video or audio content which allows visitors to download the appropriate software so they can enjoy this content.


 his is an overview of the steps one must manage to produce a project in the digital environment. The digital environment consists of digital media devices such as cameras and recorders as well a computers themselves. It extends to the Web, to digital media such as CDs and DVDs. As a consequence, you are trying to master two completely different disciplines... the technical and the artistic. You may consider yourself stronger in one discipline than another, which is natural. However, to really succeed in this business, you must be fearless of these perceived weaknesses. If you are an artist, you must learn the ways of the technical. If you are a programmer, learning how to think with the other half of your brain that is the artistic side would benefit you greatly.